Techie
Techie Question:How to add a Live TV zone to your digital signage screen?
We have been asked a few times “How do you add a Live TV zone to your digital signage screen?”. Now the way you setup Live TV zone on the screen all depends on which digital signage software or solution you use. I’m going to demonstrate this with the PADS4 solution – Windows Based solution, just to show how easy it is.
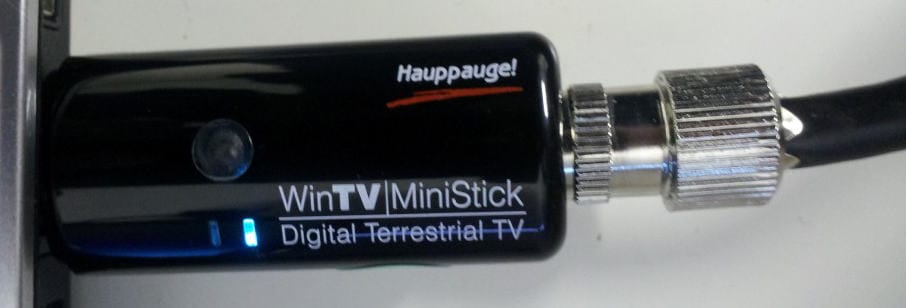
Firstly, you need to have a TV tuner card. This is a device which connects to a standard Television cable. The one that we purchased and have been using is the Hauppauge MiniStick. This is a USB device which you will need to connect to your USB port. The reason why we are using a USB device is that the digital signage units we use don’t have an internal slot for a PCIe or PCI card.
Here’s a picture of the unit we used:

We also tested Live TV with other TV tuner brands/models like the one shown below:

So now you’re ready to get all your hands dirty. Install the drivers that came with the TV tuner. NOTE: that your digital signage software may not be compatible with the TV Tuner so you will need to confirm compatability with your software provider.
The PAD solution comes with the designer software package that allows you to design your templates. Open up a blank canvas and add the Advanced TV element zone to your canvas:

After adding the Advanced TV element zone, it should look something like this (yes a black area):

Now right click on the zone and the Television Control Properties will be displayed. Click on Capture Card and it will display all the available capture cards. You will notice below that I had two USB input devices which were my external and build-in web cams. I clicked on Hauppauge SMS1000:

Click on Tuner and run the Auto scan. The software package will scan for all the available channels.

A list will be generated.

To add a particular TV channel to the Playlist, click on playlist and click add. Select the TV channel and set the duration.

There is also an option to select the colour of the background. It is best to set this to black unless you have a specific design and frame.

Click on OK and save schedule the template. The bottom left hand corner has Live TV playing.

The above template was very quick and simple to design. You will notice that on the bottom right hand corner there is a live IP streaming zone (source is a web camera). The top left zone (image of a screen) plays content from an image folder. The zone next to is a tilted video (yes!! the software allows you to make very cool and unique layouts) plays from a video folder.
So there you have it, that’s how you would add a Live TV zone to your digital screen by using PADS.
Another question we have been asked is “Can you change the TV zone channel by using the remote control?” but we will answer this in our next Techie Question post.
LIKE WHAT YOU'VE READ?
When you subscribe you will also join other Digital Signage readers who receive our content right in their mailbox. Good luck!![]()
Our Sponsors
Latest News and Comments

INNOVATIVE RETAIL EXPERIENCES THROUGH IMMERSIVE VIDEO WALLS
Posted : February 23, 2024 at 6:06 pm

AUSTRALIAN DIGITAL SIGNAGE SOFTWARE ADVERTISEME.TV
Posted : January 5, 2024 at 3:50 pm

WHY HEALTHCARE CENTRES AND HOSPITALS NEED DIGITAL WAYFINDING
Posted : August 25, 2023 at 7:14 pm

DIGITAL WAYFINDING AT TAFE EDUCATION CENTRES
Posted : July 11, 2023 at 3:33 pm
olivia william on HOW SIGNAGES HAVE CHANGED THE MOTION OF ADS
February 19, 2021 at 6:36 pmDigital Signage Blog on How do you control a video wall using Samsung MDC?
December 29, 2020 at 9:06 pmDigital Signage Blog on How do you control a video wall using Samsung MDC?
December 29, 2020 at 9:06 pmkarim on How do you control a video wall using Samsung MDC?
December 29, 2020 at 7:22 pm
Subscribe to receive the latest digital signage news
When you subscribe you will also join other Digital Signage readers who receive our content right in their mailbox. Good luck!
Advertisements
Comments (0)